Apis Networks  
SOAP Authorization
Links:
  - Implementing SOAP
  - SOAP Data Types
  - SOAP WSDL
  - SOAP Authentication
  - Language Examples
- PHP4
- PHP5
- Perl
- Ruby
- Python
- Java
- VBScript
- JavaScript
  - SOAP Explorer
Introduction Introduction:
The server needs to know who you are in order to process the SOAP request; thus, this is where the "SOAP Keyring" provision within the control panel comes in handy. SOAP keys are the only accepted form of authenticating. This means that your normal username@domain login notation will not work, as it does in with e-mail, FTP, SSH, control panel access, and so on. Instead, you will use a special identifier generated from within the control panel that functions as your login, but as an added benefit it does not contain even a shred of your login or password.
Generating an Auth Key Generating an Auth Key:
Step One: Login to the apnscp esprit control panel by visiting https://beta.cp.*servername*.apisnetworks.com/. Replace *servername* with the server name of your control panel. This can be discovered by visiting http://*yourdomainname*/cpadmin/. From there, you will be redirected to a URL that looks like https://cp.*servername*.apisnetworks.com/webhost/. Take the value from *servername* and plug it back into the apnscp esprit control panel link for the proper URL.

Note: If /cpadmin/ does not redirect to the current control panel, then your server name is vector. This is the only server to follow the old convention of /admin/.

Step One: Login 
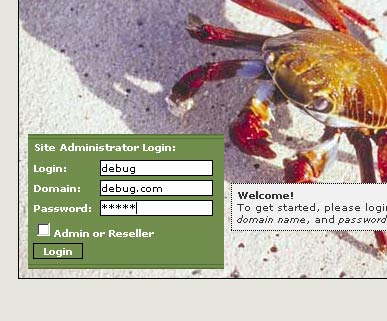
Now we have our login screen as seen with the normal control panel login. Fill in your login information you use for the normal control panel and do not tick "Admin or Reseller" — this is a special reserved option. Once the login process completes, you will be taken to the dashboard of apnscp esprit.

Step Two: Welcome to the new dashboard. Step Two: SOAP Keyring 
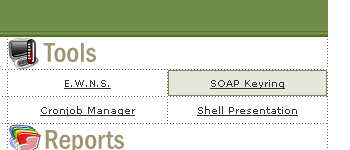
You will want to navigate to the "Soap Keyring" link in the "Tools" category to access all SOAP keys bound to your account.

Step Three: Now we have the listing of all SOAP keys associated with your account. Finally, click on "Generate A New Key" to create your first SOAP key. Step Three: Key Creation

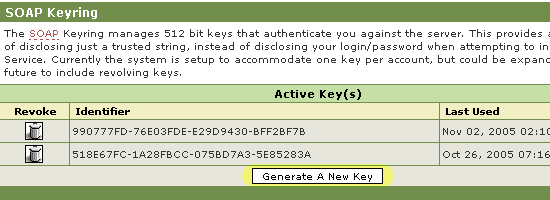
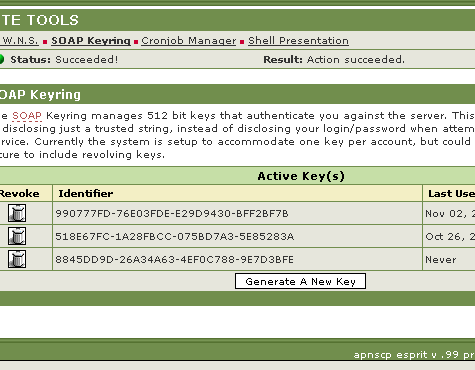
Step Four: Finally you have a key to use with SOAP. The new key generated from the action has the identifier 8845DD9D-26A34A63-4EF0C788-9E7D3BFE. This will be your authentication key to communicate with the server. There are also two other fields for each key ("identifier"): Revoke and Last Used.

The revoke action lets you delete a key from your profile. Once deleted, the key can no longer be used to authenticate with the SOAP server. This is handy if, for whatever reason, your key was compromised by a third-party. Last used lets you know when the key was last used to contact the SOAP server. Step Four: Using the Key
Authenticating via the URL Authenticating via the URL:
When specifying the SOAP endpoint or the recipient of the SOAP action, you can pass authkey=*generatedkey* off as part of the query string. For example, if our SOAP server is located at https://cp.assmule.apisnetworks.com/soap.php and we are authenticating via the key generated in the previous section (8845DD9D-26A34A63-4EF0C788-9E7D3BFE), then the request URL will look like: https://cp.assmule.apisnetworks.com/soap.php?authkey= 8845DD9D-26A34A63-4EF0C788-9E7D3BFE

This is the currently preferred method.
Authenticating via HTTP Authentication Authenticating via HTTP Authentication:
If the programming language used suports it, you can use HTTP Authentication to authenticate with the SOAP server. Your username will be soap and password is the authentication key generated from within the control panel.

This method is currently experimental.
All Rights Reserved. Copyright © 2002-2008 Apis Networks, Inc. All trademarks are property of their legal owner.
Acceptable Use Policy | Terms of Service | Privacy Policy | Site Map | Domain Registration Agreement